You do not
need to understand all the 'ins and outs' of a cars mechanical systems to be
a good driver, so don't worry! However an understanding of the basics can
really help you understand what's going on and help you learn faster. The
following A-Z has been compiled with the learner driver in mind, and contains
the essentials for learners.
This information is provided in good faith, but Freedom School of Motoring accept no responsibility for any errors, ommissions, or harm or losses caused by acting on this information.
A is for Accelerator
The Accelerator is the pedal on the right hand side. It is often referred to as the GAS pedal. The more the pedal is pushed down the faster the engine will run, and in turn the faster the car will travel. As the pedal is pushed down the amount of air/fuel mixture entering the engine increases thus increaseing its' speed.
The brakes are obviously used to slow or stop the car. They are opperated by pressing the middle pedal. This pedal should be pressed progressively by the right foot. When the pedal is pressed brakes are applied to all four wheels by hydraulic action, and the brake lights at the rear of the car will light to warn following traffic.
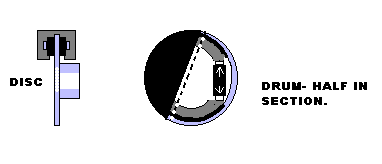
There are 2 types of brakes- Disc brakes and drum brakes. Many cars now use disc brakes on all four wheels, although some still use drums on the rear. Disc brakes work by a caliper pressing brake pads either side of a brake disc, in a similar fashion to a bicycle brake opperating on the wheel rim. Drum brakes opperate by having two semi circular brake shoes inside a drum, which push out to slow the drum.
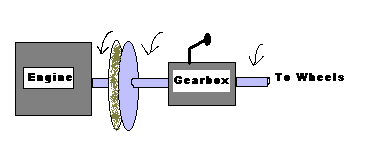
The clutch control on a manual car is the left pedal, and is operated with the left foot. The clutch is used to engage and disengage the drive smoothly when moving off and stopping, and changing gear. The drive is split by plates between the engine and gearbox. There is a friction plate or CLUTCH DISK which is made of a friction material which allows a variable amount of take up. For example the engine side of the clutch will be rotating at faster speeds than the gearbox side until it is fully engaged.When the pedal is pressed down the drive is disengaged, and as it is slowly lifted the drive is progressively engaged starting with the BITE POINT, which is where the engagement starts.
Clutch control is an acquired skill which often takes some practice. You would normally start experimenting with clutch control on your first practical driving lesson.
The following diagram is not really true of a clutch layout, but it should help you understand the principle in your minds eye!
D is for De-misters
The de-mister devices are used to keep the windscreen and rear windows clear so that you can see where you are going! The front de-mister is usually operated by setting the heater controls to de-mist etc so that the fan blows dry air onto the inside of the windscreen
The rear de-mister is usually made up of a series of thin wires in the rear window. When switched on the wires are heated and then clear the mist!
E is for Engine
The engine is the heart of the car. It provides power to drive the car by converting fuel and air into energy via INTERNAL COMBUSTION. You do not need to know how the engine works to be able to drive, but if you are interested, read an encyclopedia or relevant book to understand the principles.
F is for Footbrake
G is for Gearbox
The gearbox contains a series of gears which offer different gear ratios betwwen the engine and the wheels. For example you would want a low gear (1st gear) to move off and carry out low speed manouevres, the middle gears (2nd, 3rd) to build your speed or climb a hill, and a high gear(4th or 5th) to cruise at a reasonable speed. The gearbox also contains a reverse gear for moving the car backwards. Automatic cars have a gearbox which changes the gears automatically depending on speed etc.
SEE ALSO "CLUTCH" and "NEUTRAL"
The handbrake is the lever usually between the front seats. It is opperated with the left hand. When the lever is up the REAR(on almost all cars)BRAKES are applied in order to HOLD the car still, for example on a hill, or when parking. The handbrake must NEVER be applied while the car is moving as the rear wheels can easily skid and cause a loss of control. To apply the handbrake, push in the button, pull the lever up, and then release the button to 'lock' the lever up. To release the handbrake pull the lever up a little whilst pushing in the button, and then lower it to the floor.
NOTE- Many drivers pull up the handbrake without pushing in the button- you can hear the rasping sound! This is a BAD HABIT as it can damage the handbrake ratchet(locking device).
I is for Indicators
The indicators are the orange lights on the corners of the car that flash to show other road users that you intend to turn, change lane, or pull in to park. They are operated by pushing the indicator 'stalk',(on the left or right of the steering wheel),up or down.
There are also 'hazard flashers' on most cars. The hazard flasher switch is pressed to make all of the indicators flash at the same time. These are used when the car is stationary in a hazardous position, for example if you brake down.
Since around 1980 all cars have also been fitted with 'repeater lights' on both front sides of the car, which flash with the indiacators on that side.
J is for Jack
The jack supplied with a car is used to lift a corner of the car to change a wheel. It is usually found in the boot or under the bonnet. The car has 'jacking points' underneath, usually in the corners by the wheels. The jack is positioned under the jacking point, the handle turned and then this lifts the corner of the car to raise the wheel off of the ground.
JACKING UP A CAR IS DANGEROUS! CARS ARE EXTREMELY HEAVY! A FALLING CAR CAN KILL!
It is RECOMMENDED that you get help and assistance if you have not 'jacked up' a car before. The car should be on level ground, and have the handbrake firmly secured. Never lie under a jacked up car,or sit with a foot etc under it! Under car maintenance should only be carried out with the car properly supported by axle stands etc.
L is for Lights
The lights are at the front of the car to see and be seen. There are usually 3 settings. The 1st is 'Sidelights' which has the headlights slightly illuminated to help your car be seen. The 2nd is 'Dipped Beam' which has the headlights brightly illuminated and dipped down and to the left. This is the normal position which helps you to see the road in front at night etc, without dazzling oncoming trafic. The 3rd is 'Main Beam' which has the headlights very brightly illuminated and the beam is thrown out high and wide. This gives good visibility on roads such as country lanes, but the lights must be switched back to the dipped setting if there is oncoming traffic or a vehicle in front.
With all the light settings, the rear lights are illuminated the same amount. In areas of very reduced visibility use 'Fog lights'. These are very high intensity lights mounted at the rear of all cars since aprox 1980, and low down at the front of many modern cars. They must be switched off during normal conditions.
M is for Mirrors
The mirrors are there to help aid visibility to the rear and sides of the car. It is very important to set your mirrors before you set off whenever you are the new driver of a car, for example at the start of every driving lesson! Ask your Driving Insructor to help you set them up correctly!
The mirrors DO NOT SHOW EVERYTHING! There are many BLINDSPOTS which are areas around the car which you cannot see in the mirrors. The main blindspot is to the side of the car, and so it is crucial to check over your right shoulder before moving off!
Neutral is the position on the gear lever where there is no gear selected. You can feel it where the gear lever feels 'floppy'. it is vital that you check that neutral is selected before starting the engine to prevent the car jumping forwards or backwards. The gear lever should be returned to neutral once the car has been parked, but NEVER whilst on the move! Your Driving Instructor should explain further!
O is for Oil
The engine contains oil which lubricates it's moving parts which helps it to run smoothly and minimise wear. Sometimes older engines can loose some of this oil by either burning it or allowing it to leak. It is therefore important to check the oil level regularly to make sure the engine can run correctly.
It is usually a very straightforward procedure. With the engine switched off, open the bonnet, locate the dipstick, and pull it out. Wipe off the oil with an old cloth, push it back in, pull it back out and read the level from the markings. If it needs to be topped up simply pour the required amount of oil, typically 1/4 litre (check handbook for oil type etc),into the engine by removing the oil filler cap. Repeat the dipstick proceedure to check level. If in any doubt seek help from a friend and/ or the owners manual. DO NOT OVER FILL ABOVE THE MAXIMUM MARK, AND BE CERTAIN THAT YOU ARE USING THE OIL FILLER CAP, AND NOT A CAP FOR WATER OR BRAKE FLUID!!
P is for Petrol
The cars' engine burns petrol or diesel fuel to generate power. There is a gauge on the cars dashboard to show how much fuel is in the tank.
R is for Revcounter
The Rev counter is a clock like guage fitted to some cars, usually next to the speedometer. The revcounter shows the speed that the engine is at in RPM (revolutions per minute). The gauge will have markings for the maximum revs of the engine, as well as the 'danger zone' just before the maximum.
S is for Speedometer
The speedometer is a clock like gauge positioned in front of the driver which shows the speed that the car is travelling at. Some modern cars have a digital readout for the speed.
T is for Tow hooks
Cars are equipped with tow hooks at the front and rear to tow and be towed, perhaps after a breakdown.
V is for Vision
It is very important to have good all round vision in the car. Keep all windows and mirror lenses clean at all times. Many drivers neglect to clean the inside of the windows, but these are often more dirty than the outside, as they are not being wiped when it rains etc.
During winter months use the cars' demisters to keep the windscreen and rear window clear of condensation on the inside. Avoid wiping steamy windows with your hands as the grease smudges left can seriously effect visibility, especially at night!- use a clean cloth etc, or wait for the demisters to clear the condensation.
W is for Wipers
The wipers are used to clear rain from the windscreen to aid visibility. Most cars have several speed settings for the wipers including an intermittant setting. All cars have a screenwash facility which sprays a cleanning solution onto the windscreen whilst wiping. Use this facility to clear grime and flys etc from the windscreen when it is not raining.
Many cars also have a rear wiper.
X is Xylophone, Y is for Yo-Yo, Z is for Zip
Do not play with any of these whilst driving!
The text and diagrams contained in this page are © Freedom School of Motoring, and may not be reproduced without written permission.